2022最新保姆级教程-带娃去新加坡要怎么给孩子办理疫苗公证-VERIFICATION-OF-VACCINATION

保姆级教程-带娃去新加坡要怎么给孩子办理疫苗公证?!

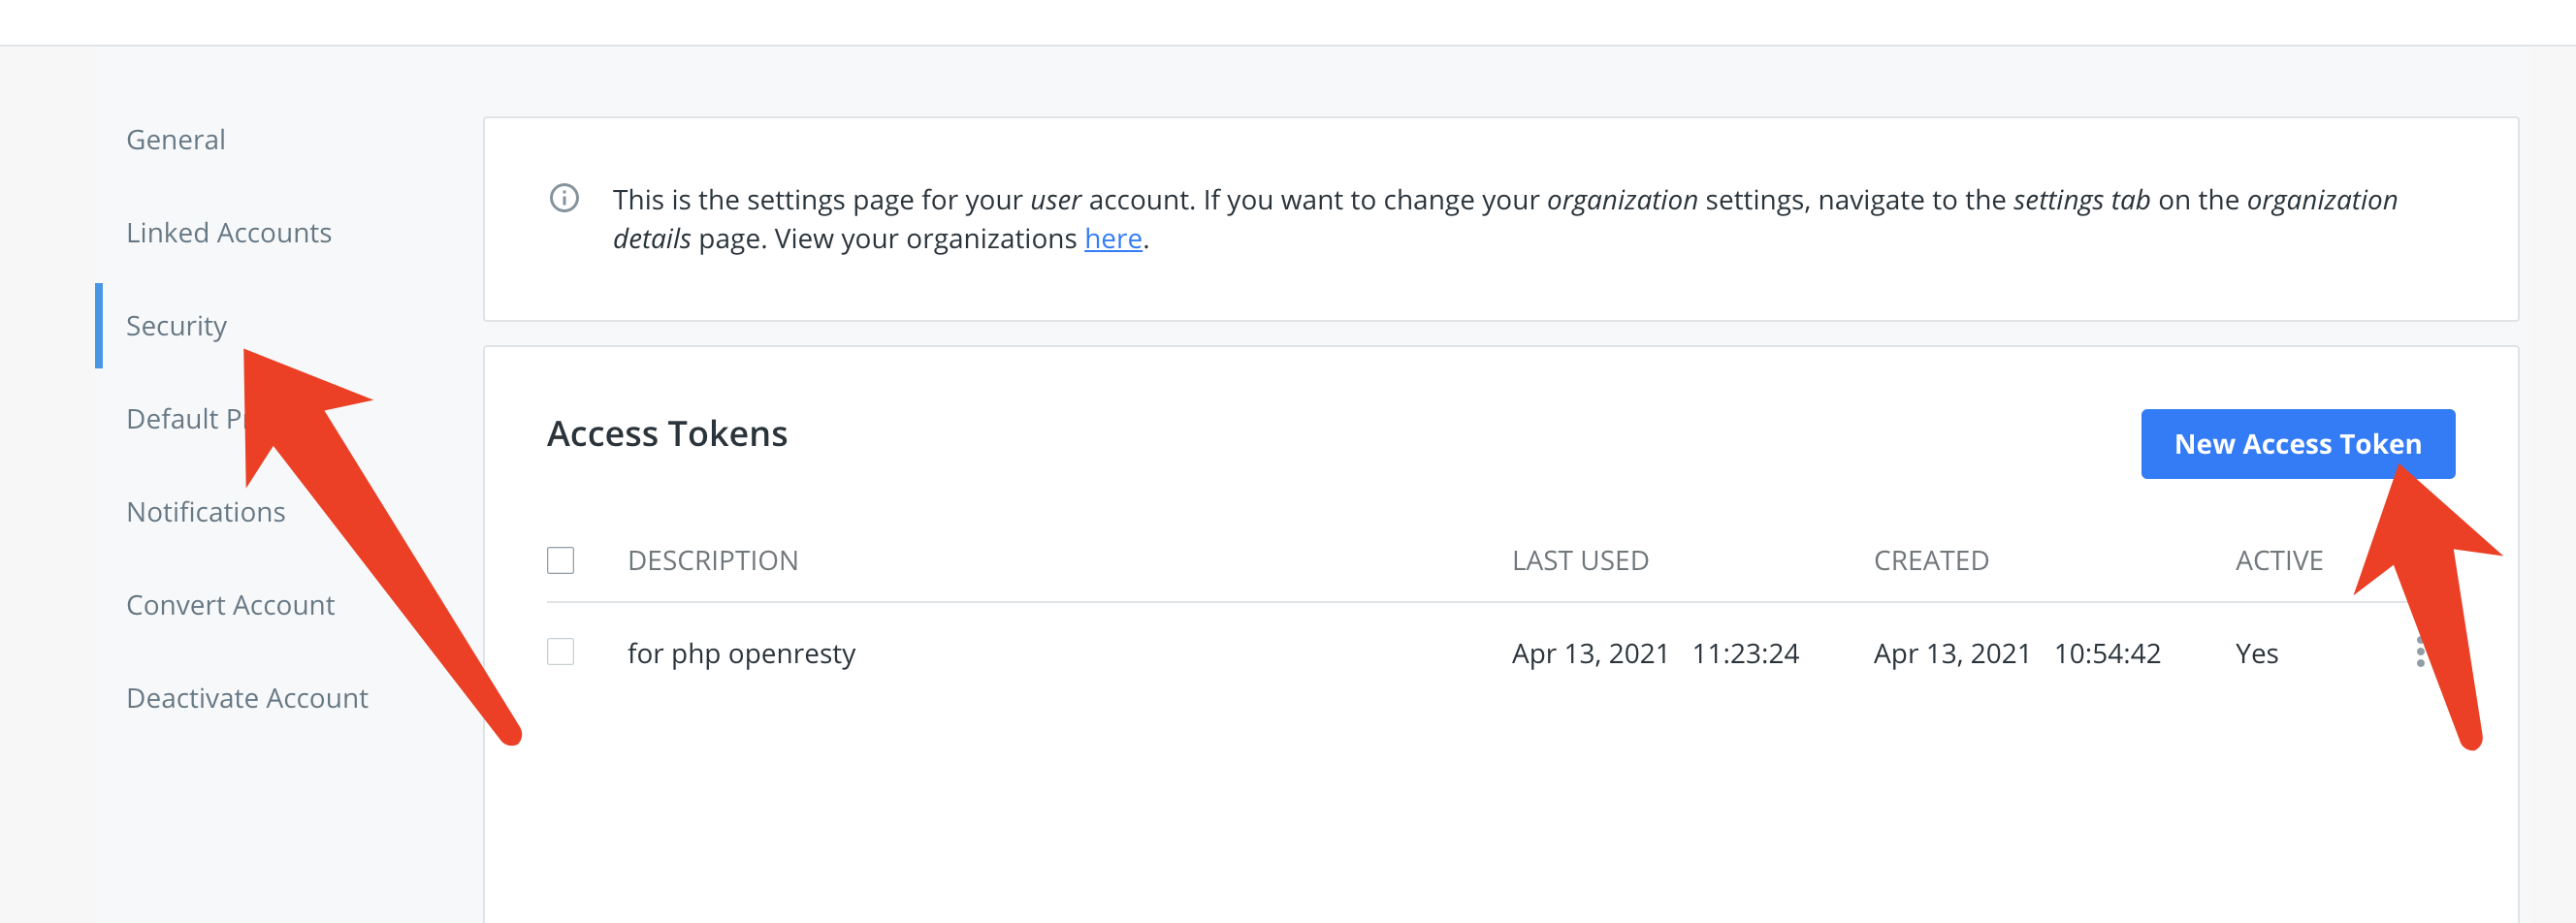
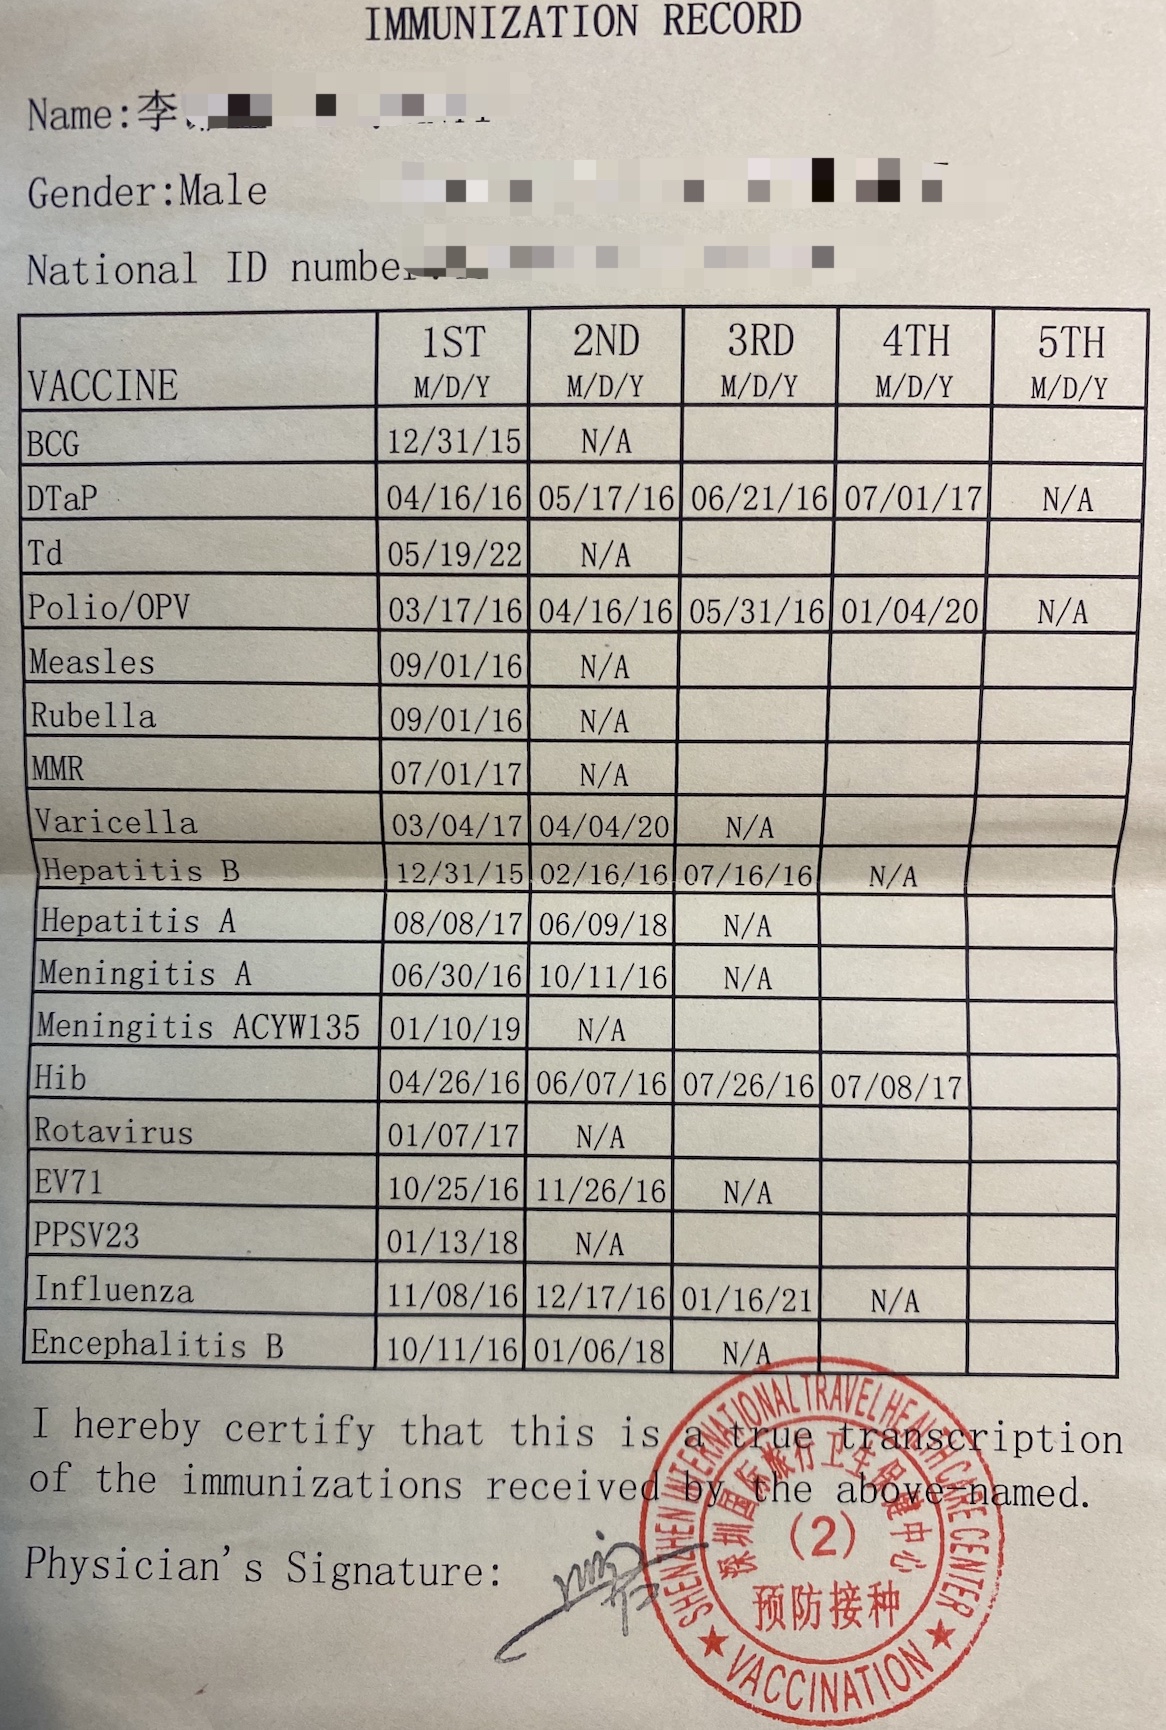
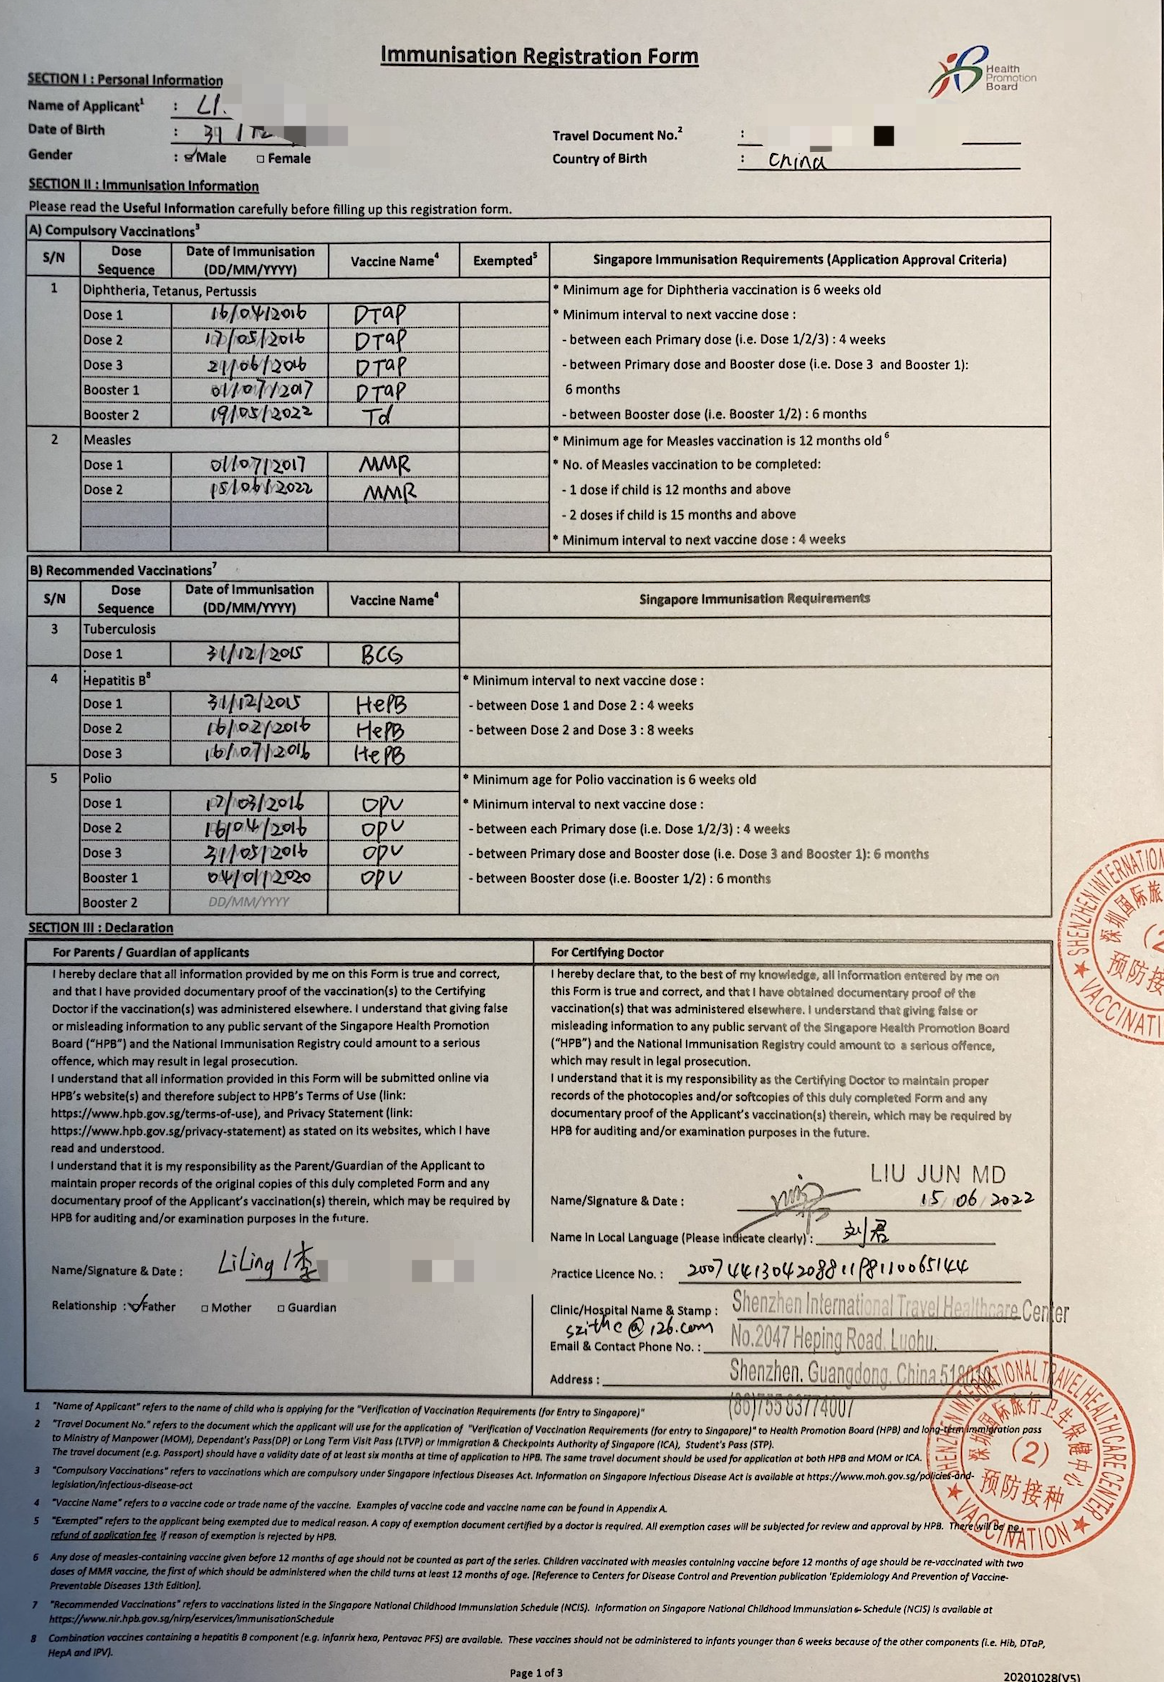
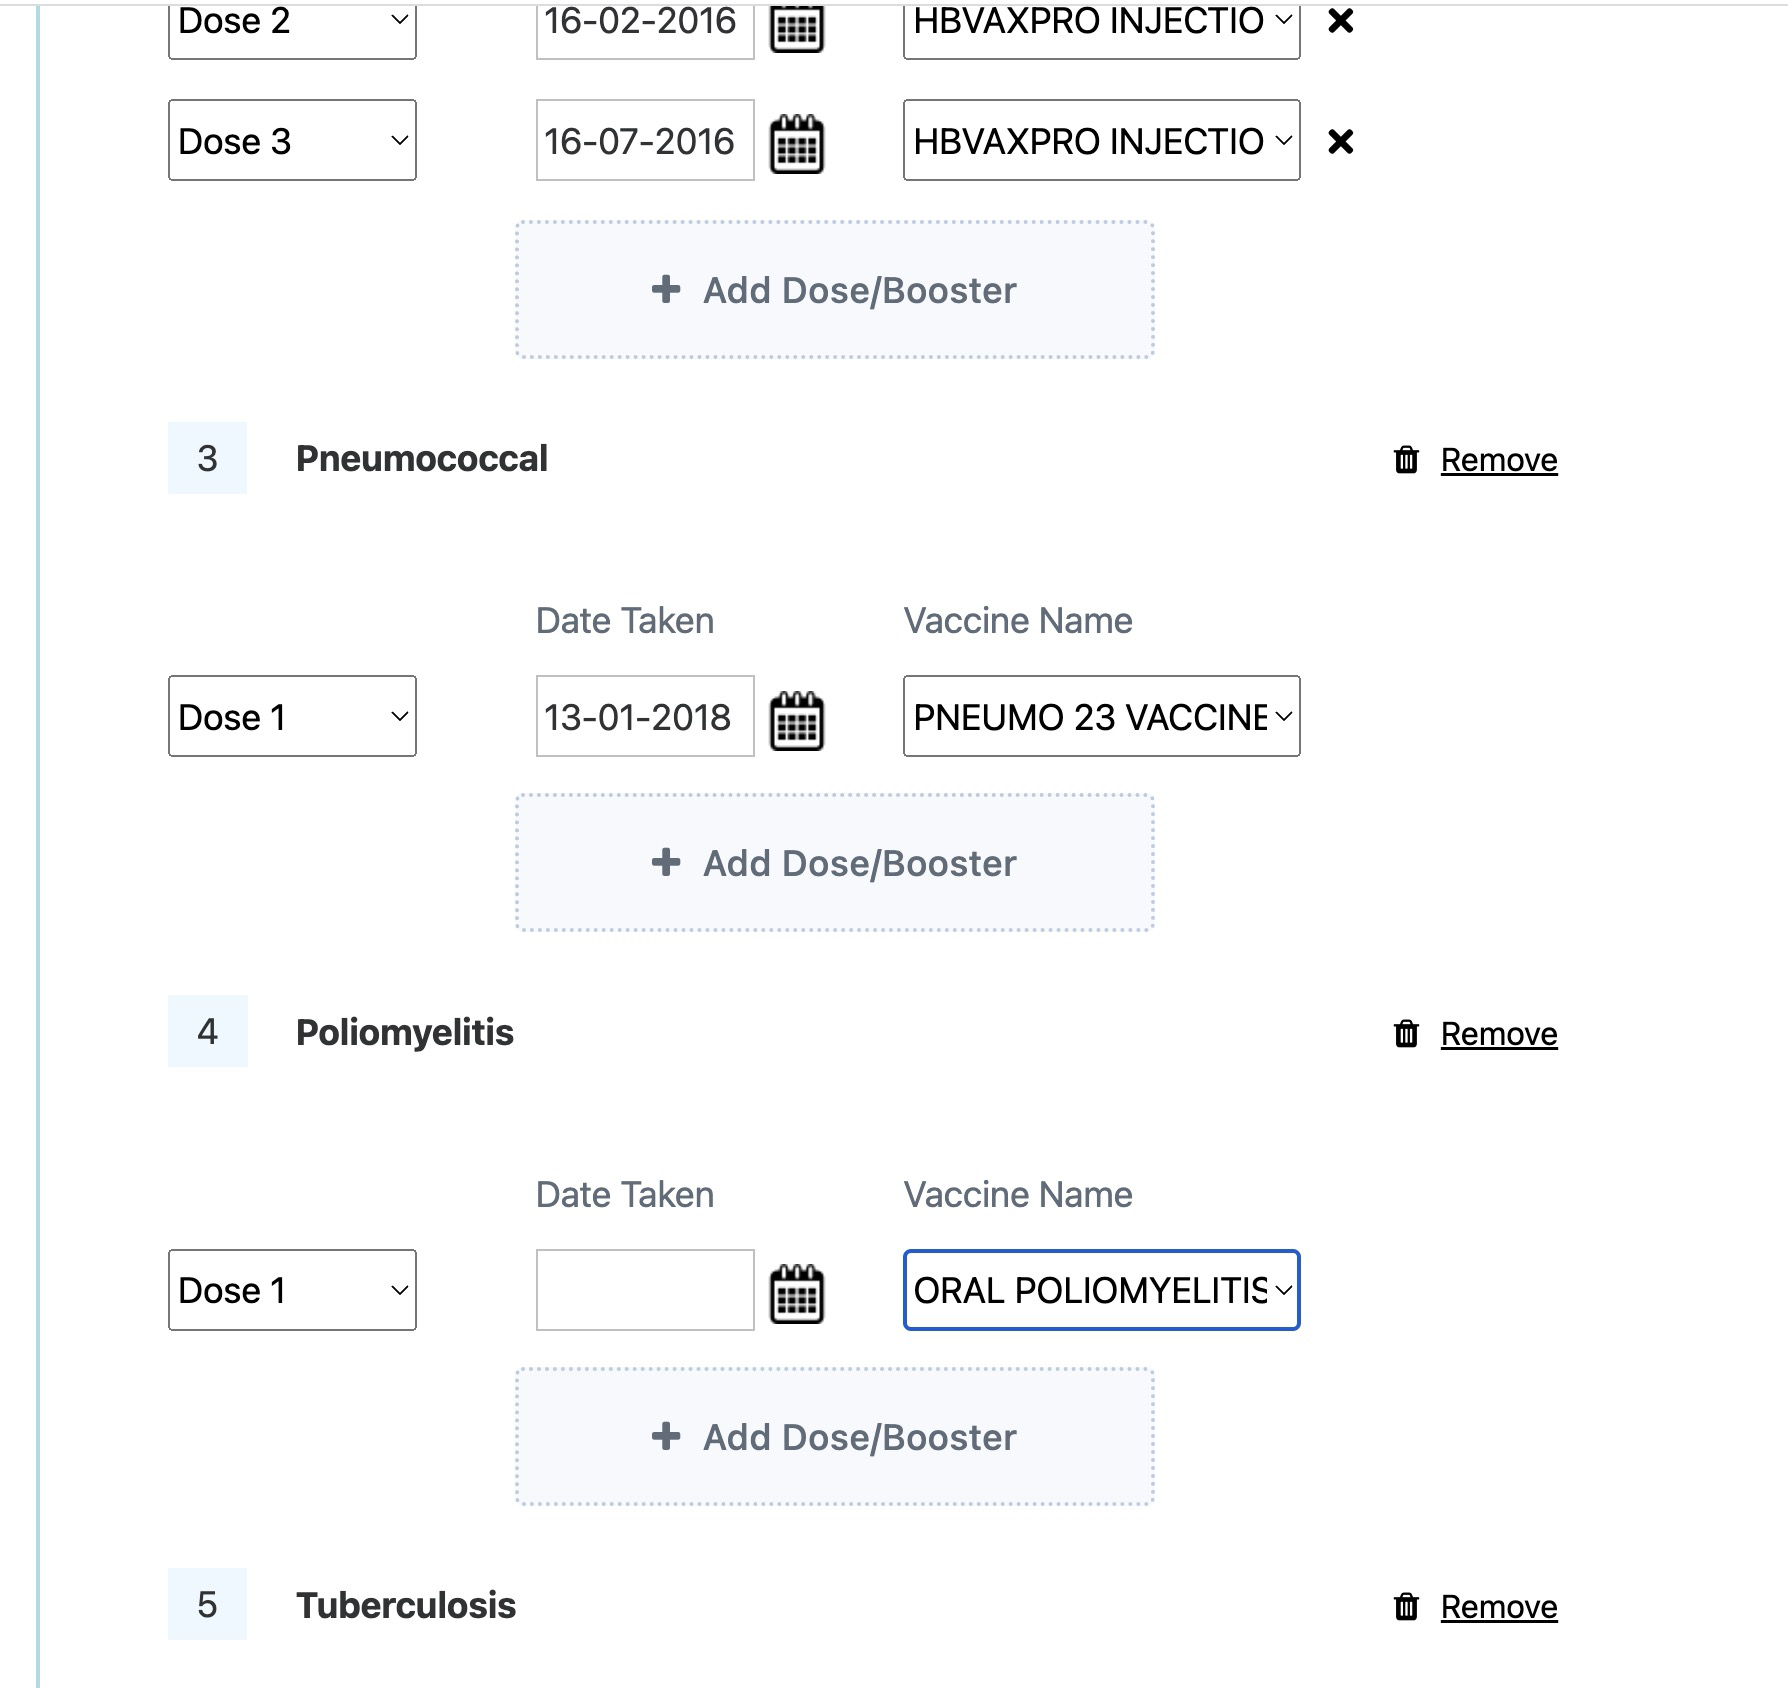
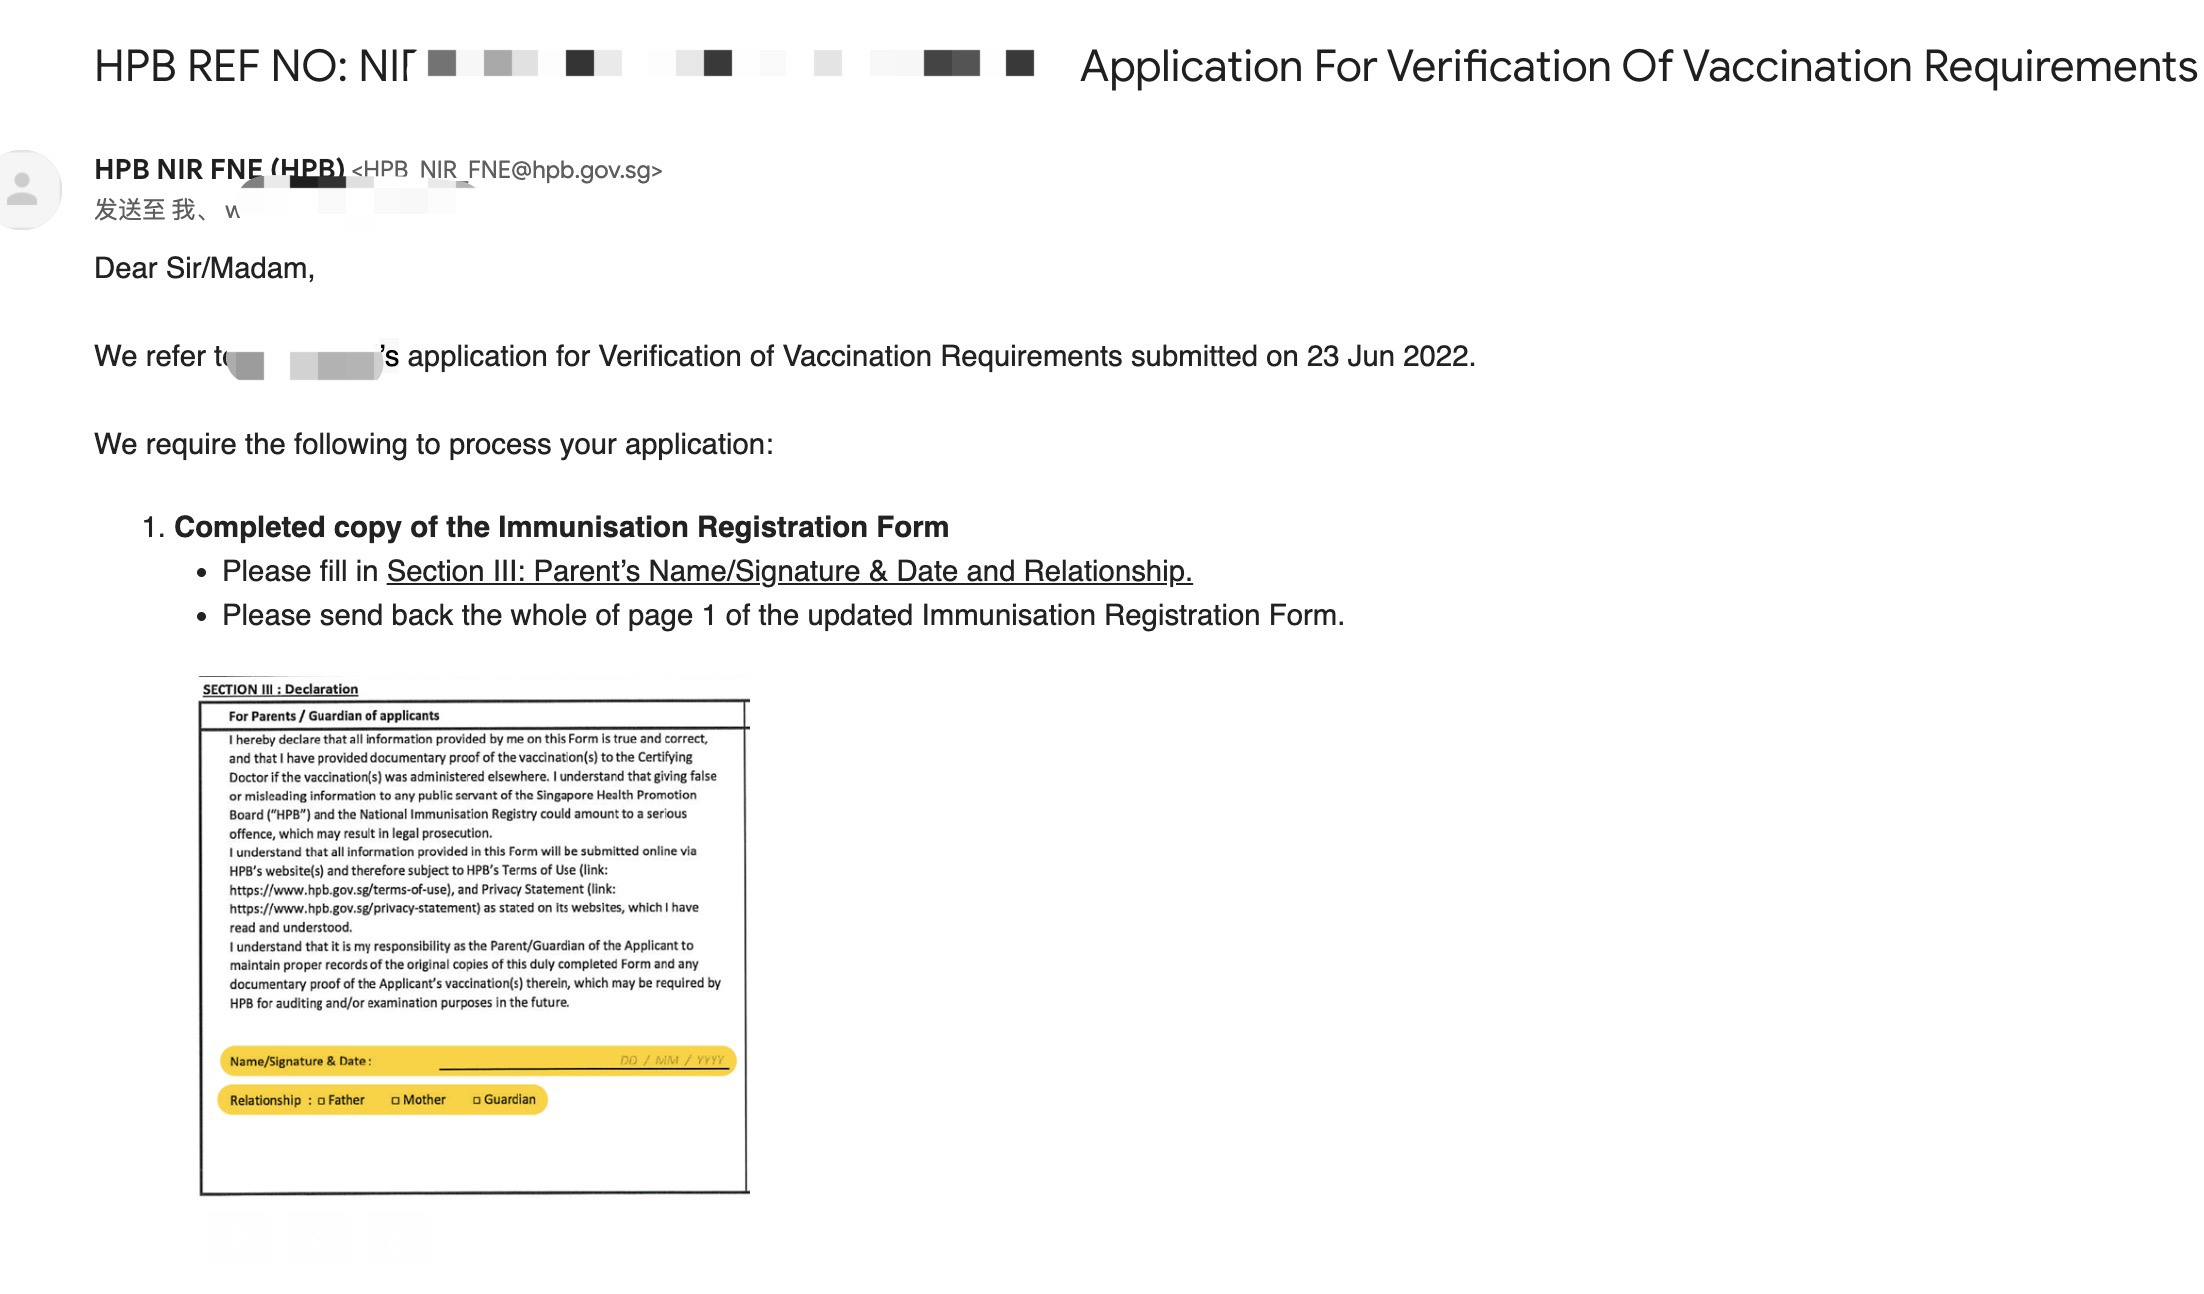
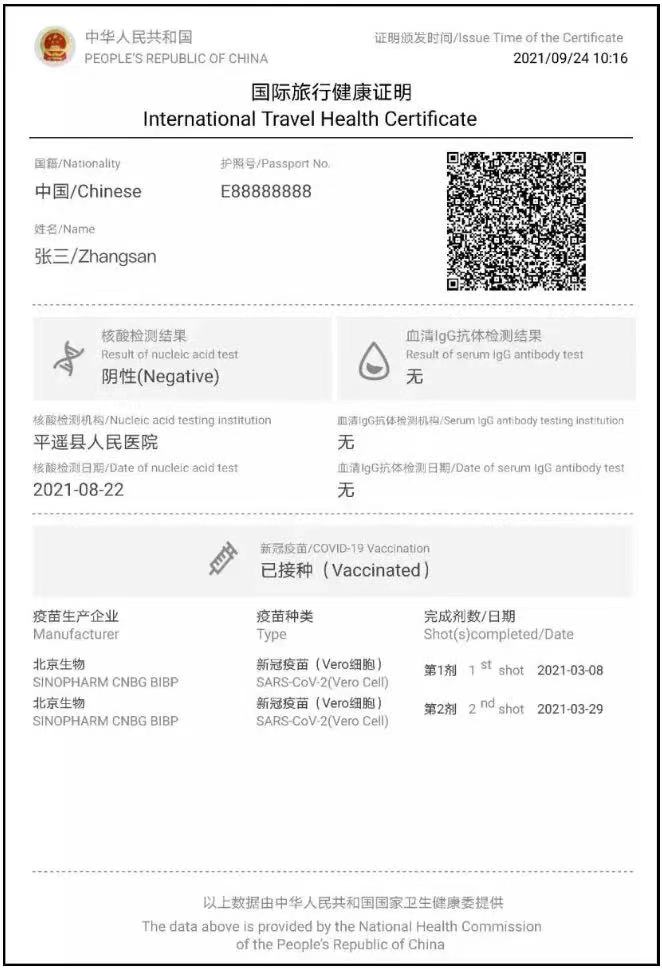
带孩子去新加坡的话,一般都是DP家属签证或者学生签证,无论那种都是需要在新加坡的HPB网站办理一个疫苗公证(又叫 VERIFICATION OF VACCINATION),然后才能申请签证,简单来说就是上传一系列的PDF,再缴30新币,得到下图PDF文件,这个PDF是申请家属签证必须提供的材料,而且一般代理办EP的也不会帮你申请,需要自己申请。

Untitled

申请网站:https://www.nir.hpb.gov.sg/fcine/

要准备的草料(带去”国际旅行卫生保健中心“):

  • 儿童2寸彩色照片
  • 儿童+父母的护照
  • 原国内的绿色疫苗本
  • 儿童身份证
  • 从新加坡HPB网上下载的 ImmunisationFormsForForeignChild.pdf 并打印出来。

操作说明:

因为向HPB申请疫苗公证的时候需要提交曾经接种白喉(diphtheria)及麻疹(measles)的记录。

白喉(Diphtheria):注射的第一针必须至少在六周以上,否则视为无效,需要重新注射,达到最低两针的要求。一般来说,中国孩子基本不需要补打白喉疫苗。

麻疹(Measles):注射的第一针必须至少在一周岁以后(含一周岁),否则视为无效,需要重新注射,达到最低两针的要求。

在中国,麻疹疫苗是在8月龄接种的,所以中国的孩子到新加坡基本上都要去”国际旅行卫生保健中心“补打MMR。

同时需要在”国际旅行卫生保健中心“拿到翻译过的疫苗原始记录(IMMUNIZATION RECORD),一般夹在小黄本里面。

操作步骤

  1. 先电话咨询去当地的”国际旅行卫生保健中心“,询问有没有苗,说补打麻腮风疫苗(通常现在打的是三联疫苗MMR)

  2. 然后在”国际旅行卫生保健中心“ 得到一本黄色的”疫苗接种或预防措施国际证书“,内附了翻译过的小孩曾经打过的疫苗说明(IMMUNIZATION RECORD)以及公章记录,如下图(把所有页面都拍照做成一个 PDF-1)。

    Untitled

    WeChatWorkScreenshot_4d222190-5c12-43fb-9fe7-253ccfd956ff.jpg

  3. 在打完疫苗之后,把打印的 ”Immunisation Registration Form“,交给那边的办事人员填写一个完整的疫苗记录,同时家长记得在 SECTION 3 签名。(把第一页和第二页拍照做一个PDF-2)

    Untitled

  4. 去当地“公证处”给小孩的出生证做公证和翻译,大概需要1周的时间,所以可以提前做(把出生证原件和翻译件拍照做到一个PDF里面,PDF-3)

  5. 把父母的护照详情页拍照 放到一个 PDF 里面,PDF-4。

  6. 准备上述4个PDF文件

  7. 去HPB网站提交疫苗和身份信息。

其中要注意的是,在HPB的网站里面 有些 Vaccine Name 可能和 ImmunisationFormsForForeignChild.pdf 最后一页的名字对不上,但是其实我操作下来只要名字大概对得上就可以了,如下图。

Untitled

最后上面的4个PDF(控制2MB以内)都准备好了可以去HPB的网站去申请了。缴完30新币的注册费 就等HPB的email就可以了。

推荐几个我常用的照片转PDF工具

iPhone导出图片太大需要把 heic 批量转为jpg: https://heictojpg.com/

把多个jpg做成 PDF : https://www.ilovepdf.com/zh-cn/jpg_to_pdf

等待结果:

目前大概需要20个工作日,如果有问题 HPB的 email (下图1) 会告诉你需要补充什么资料的。

才能拿到最后的疫苗公证,如下图2的PDF,然后再去申请DP了。

Untitled

Untitled

关于新冠疫苗

12岁及以下未完全接种疫苗可赦免,13岁以上需要。

进入“防疫健康码国际版”微信小程序,点击“出国人员入口”下的“查看及出示国际旅行健康证明”。

根据小程序提示填写个人信息后,就可以得到一份pdf版本的国际旅行健康证明了。

拿到国际旅行健康证明之后,我们需要登录新加坡SafeTravel官网,填写个人信息并上传证明之后,就可以拿到一封疫苗接受信(vaccination acceptance letter),它可以帮我们更加顺利地入境。

疫苗认证链接:

https://eservices.ica.gov.sg/STO1/VCP

Untitled

来源:

https://www.shicheng.news/v/nzvx8

https://mp.weixin.qq.com/s/IRBsuMELYLYRTCsOH6r37A

https://vasteredu.com/news/18.html

Build a specialized fields Chinese full-text search engine with Elasticsearch/IKAnalysis/jieba

Background

Many projects often need a search engine, but for Chinese content, we can not simply use MySQL like to search, especially for the professional field Chinese sentence search, we need specialized words from corpus to bring better search result, because the Chinese words are not split with spaces, which requires us to do two things.

  • 1 Extract specialized words/vocabulary from corpus existed, such as brand, character names, you can also polish your dict manually.
  • 2 Import that specialized vocabulary into the search engine and the search engine(Elasticsearch) can index those keywords split by IK analyzer.

Prerequisite

Elasticsearch

Elasticsearch Analysis Plugin: IK

Jieba stutter, Chinese text segmentation tool

Other Option: https://github.com/NLPchina/ansj_seg

How to do it

Install Elasticsearch/Kibana/IKAnalysis with Docker

docker-compose.yml

1
2
3
4
5
6
7
8
9
10
11
12
13
14
15
16
17
18
19
20
21
22
23
24
25
26
27
28
29
30
31
32
33
34
35
36
37
38
39
40
41
42
43
44
45
46
version: '2.2'
services:
kibana:
image: docker.elastic.co/kibana/kibana:7.11.2
volumes:
- ./kibana.yml:/usr/share/kibana/config/kibana.yml
networks:
- elastic
ports:
- 9601:9601
- 8893:8893
environment:
SERVER_NAME: kibana.example.org
ELASTICSEARCH_HOSTS: http://172.17.0.3:9200
es01:
image: docker.elastic.co/elasticsearch/elasticsearch:7.11.2
container_name: es01
environment:
- node.name=es01
- cluster.name=es-docker-cluster
- cluster.initial_master_nodes=es01
- bootstrap.memory_lock=true
- "ES_JAVA_OPTS=-Xms4g -Xmx4g"
ulimits:
memlock:
soft: -1
hard: -1
volumes:
- data01:/usr/share/elasticsearch/data
- ./plugin/ik:/usr/share/elasticsearch/plugins/ik
ports:
- 0.0.0.0:9200:9200
networks:
- elastic

volumes:
data01:
driver: local

networks:
elastic:
driver: bridge
ipam:
driver: default
config:
- subnet: 172.33.238.0/24

kibana.yml

1
2
3
4
server.port: 9601
server.host: "0.0.0.0"
enterpriseSearch.host: "http://172.17.0.3:9200"
elasticsearch.hosts: "http://172.17.0.3:9200"

How directory looks like is below
We need download elasticsearch-analysis-ik-7.11.2.zip and unzip it in directory plugin as we mapped it in volumes in file docker-compose.yml

1
2
3
4
5
6
7
8
9
10
11
12
13
14
15
16
17
18
19
20
21
22
23
24
25
26
27
./
├── docker-compose.yml
├── kibana.yml
└── plugin
└── ik
├── commons-codec-1.9.jar
├── commons-logging-1.2.jar
├── config
│   ├── extra_main.dic
│   ├── extra_single_word.dic
│   ├── extra_single_word_full.dic
│   ├── extra_single_word_low_freq.dic
│   ├── extra_stopword.dic
│   ├── Cosmetics.dic
│   ├── IKAnalyzer.cfg.xml
│   ├── main.dic
│   ├── preposition.dic
│   ├── quantifier.dic
│   ├── stopword.dic
│   ├── suffix.dic
│   └── surname.dic
├── elasticsearch-analysis-ik-7.11.2.jar
├── elasticsearch-analysis-ik-7.11.2.zip
├── httpclient-4.5.2.jar
├── httpcore-4.4.4.jar
├── plugin-descriptor.properties
└── plugin-security.policy

Cosmetics.dic is the file that contains Chinese word that need to be tokenized.
here is the example of some cosmetics brands

1
2
3
4
烟酰胺
抗蓝光
康萃乐
怡丽丝尔

Segmentation (get Cosmetics.dic from corpus)

Here we need Jieba Segmentation Tool which is intent to built the best Python Chinese word segmentation module.
corpus need to be ready in with txt format.
the corpus should contains specialized Chinese words

1
2
3
git clone github.com/fxsjy/jieba
cd jieba/test
python extract_tags_with_weight.py chinese-specialized-corpus.txt -k 10000 -w 1

take cosmetics corpus as an example, the result should like below, those result can import to Cosmetics.dic.

if possible, with manually edited and refined keyword brings better search experience

1
2
3
4
5
6
7
8
9
10
11
12
13
14
15
16
tag: 50ml		 weight: 0.213126
tag: 雅诗兰黛 weight: 0.155035
tag: ysl weight: 0.144286
tag: 新版 weight: 0.143799
tag: 面霜 weight: 0.139773
tag: 100ml weight: 0.132471
tag: 阿玛尼 weight: 0.116844
tag: 兰蔻 weight: 0.114584
tag: 粉底液 weight: 0.113962
tag: 香奈儿 weight: 0.108075
tag: 精华 weight: 0.104448
tag: 30ml weight: 0.100020
tag: sk2 weight: 0.099609
tag: 科颜氏 weight: 0.091035
tag: 面膜 weight: 0.089536
tag: 洁面 weight: 0.086686

IK Configration

plugin/ik/config/IKAnalyzer.cfg.xml

1
2
3
4
5
6
7
8
9
10
11
12
13
<?xml version="1.0" encoding="UTF-8"?>
<!DOCTYPE properties SYSTEM "http://java.sun.com/dtd/properties.dtd">
<properties>
<comment>IK Analyzer 扩展配置</comment>
<!--Users can configure their own extended dictionary here-->
<entry key="ext_dict">/root/plugin/ik/config/huazhuangping.dic</entry>
<!--Users can configure their own extended stop word dictionary here-->
<entry key="ext_stopwords"></entry>
<!--Users can configure the remote extension link here -->
<entry key="remote_ext_dict">https://xxxxxx/word_for_elasticsearch.txt</entry>
<!--The user can configure the remote extension stop word dictionary here-->
<!-- <entry key="remote_ext_stopwords">words_location</entry> -->
</properties>

Test IK Tokenazier

Open kibana dev http://kibana.xxx.com/app/dev_tools#/console

1
2
3
4
5
POST yunzhaohuo_index/_analyze
{
"analyzer": "ik_smart",
"text": "纪梵希润唇抗蓝光"
}

Here, we can see the parser has take effective, and the text above has been split into three different Chinese words

1
2
3
4
5
6
7
8
9
10
11
12
13
14
15
16
17
18
19
20
21
22
23
24
25
26
{
"tokens" : [
{
"token" : "纪梵希",
"start_offset" : 0,
"end_offset" : 3,
"type" : "CN_WORD",
"position" : 0
},
{
"token" : "润唇",
"start_offset" : 3,
"end_offset" : 5,
"type" : "CN_WORD",
"position" : 1
},
{
"token" : "抗蓝光",
"start_offset" : 5,
"end_offset" : 8,
"type" : "CN_WORD",
"position" : 2
}
]
}

ES Configrations

1: Create Index

run in Shell to create index

1
curl -XPUT http://localhost:9200/product_inventory

2: Create mapping for index with ik_smart

Suppose we are creating a search engine for ecommercial with field Id,product_desc
and product_desc is the field that we want to search with full-text.

1
2
3
4
5
6
7
8
9
10
11
12
13
14
15
16
17
18
19
20
21
22
curl -XPOST http://localhost:9200/product_inventory/_mapping -H 'Content-Type:application/json' -d'{
"properties" : {
"@timestamp" : {
"type" : "date"
},
"Id" : {
"type" : "long"
},
"product_desc" : {
"type" : "text",
"analyzer": "ik_max_word",
"search_analyzer": "ik_max_word"
},
"price" : {
"type" : "long"
},
"updateTime" : {
"type" : "date",
"format" : "yyyy-MM-dd HH:mm:ss"
}
}
}'

3: Insert Data to ES

Run in kiaban Dev Console

1
2
3
4
5
6
POST /product_inventory/_create/1
{
"product_desc":"抗蓝光洗面奶",
"price":"3",
"updateTime":"2021-01-03 12:22:11"
}

4: Search Data from ES

Search with _score sorted, you will see those result with _score.

1
2
3
4
5
6
7
8
9
10
11
12
POST /yunzhaohuo_index/_search?size=995&from=0
{

"query" : {
"match": {
"product_desc": "抗蓝光"
}
},
"sort": {
"_score" : "desc"
}
}

Golang 动态加载 protobuffer 文件之动态解析pb二进制数据,输出JSON

在业务中经常有这种需求,给某某服务加一个命令字,用来接收的RPC 请求来的protobuffer数据,按照某个pb数据定义反序列化之后,转成JSON 再传输到下游服务。

如果安装我们原来的方案,可能需要每次都修改pb文件,再编译服务再上线

旧的方式:
1、修改proto文件。
2、protoc 产出 *.pb.go文件,
3、编译服务。

但是实际上我们可以在golang 代码里面自动解析proto文件,整个流程在服务内部自动完成。

新的方式:
1、启动服务(从配置服务器加载 proto文件)
2、通过proto文件产生的一个 FileDescriptor ,进而根据对象名称找到 MessageDescriptor
3、直接用MessageDescriptor

可以看到新的方式 ,本质就是需要实现动态pb解析和协议转换的工作。

下面我们看示例代码
保存如下pb定义为test.proto

1
2
3
4
5
6
syntax = "proto2";
package test;
message AddFriendReq {
repeated string phone = 1;
optional string keyword =2;
}

示例代码
代码本身是依赖了一个三方包:github.com/jhump/protoreflect

1
2
3
4
5
6
7
8
9
10
11
12
13
14
15
16
17
18
19
20
21
22
23
24
25
26
27
28
29
30
31
32
33
34
35
36
37
38
39
40
41
42
43
44
45
46
47
48
49
50
51
52
53
54
55
56
57
package main

import (
"bytes"
"fmt"

testpb "github.com/lilien1010/my_gotest/proto" //这个包是从上面的pb文件生产的,用来做序列化测试
"github.com/golang/protobuf/proto"
"github.com/jhump/protoreflect/desc/protoparse"
"github.com/jhump/protoreflect/desc/protoprint"
"github.com/jhump/protoreflect/dynamic"
)

func main() {

Filename := "./proto/test.proto"

Parser := protoparse.Parser{}
//加载并解析 proto文件,得到一组 FileDescriptor
descs, err := Parser.ParseFiles(Filename)
if err != nil {
fmt.Printf("ParseFiles err=%v", err)
return
}

//这里的代码是为了测试打印
Printer := &protoprint.Printer{}
var buf bytes.Buffer
Printer.PrintProtoFile(descs[0], &buf)
fmt.Printf("descsStr=%s\n", buf.String())

//descs 是一个数组,这里因为只有一个文件,就取了第一个元素.
//通过proto的message名称得到MessageDescriptor 结构体定义描述符
msg := descs[0].FindMessage("test.AddFriendReq")
//再用消息描述符,动态的构造一个pb消息体
dmsg := dynamic.NewMessage(msg)

//pb二进制消息 做反序列化 到 test.AddFriendReq 这个消息体
err = dmsg.Unmarshal(GetMessageBin())

//把test.AddFriendReq 消息体序列化成 JSON 数据
jsStr, _ := dmsg.MarshalJSON()
fmt.Printf("jsStr=%s\n", jsStr)
}

//可能从远程服务得到一些二进制数据,这里为了方便测试,用本地序列化的pb
func GetMessageBin() []byte {
req := &testpb.AddFriendReq{
Phone: []string{"13145990022", "131313233"},
Keyword: proto.String("I am good"),
}
bin, err := proto.Marshal(req)
if err != nil {
fmt.Printf("bin=%v,err=%v", bin, err)
}
return bin
}

About Me

  • Shopify Engineer
  • Apahce APISIX PMC
  • KubeSphere Member
  • Openresty Contributor
  • Anyway, can be a OpenSource Contributor
  • Used to work with Lua, Golang, Openresty, K8S, React.
  • Tiny Individual Entrepreneur

Previously served at HelloTalk and Tencent

Hi Dude

  • 🐳 I’m currently learning\working on Golang\K8S\OpenResty\APISIX\Ruby.
  • 🤔 I’m thinking changing the world more or less.
  • 💬 Welcomed to ask me about debug.
  • 📫 How to reach me: email:liling@apache.org

Liling's github stats
[Wechat]

使用 Github Action 自动发布Docker镜像到 Dockerhub

因为工作需要 用到自定义的 PHP+Openresty 镜像, 所以自建构建了一个镜像存放在dockerhub。

Dockerhub:lilien1010/php_openresty

Dockfile:php_openresty

但是每次在 dockfile 里面添加修改一点东西 都要手动 发布image 到 dockerhub 很费时费力。

所以可以用 github action 来完成自动化的工作。

开通 Dockerhub token

配置 Github 秘钥

把 dockhub 的用户名和 token 填写到 secrets 环境。

配置 Github Action

参考:workflows/push_dockerhub.yml

注意:下面的 DOCKERHUB_USERNAME 和 DOCKERHUB_TOKEN 这两个名字要和在 github repo setting 里面配置的 secrets 要一致。

1
2
3
4
5
6
7
8
9
10
11
12
13
14
15
16
17
18
19
20
21
22
23
24
25
26
27
28
29
30
31
32
33
name: ci

on:
push:
branches:
- 'master'

jobs:
docker:
runs-on: ubuntu-latest
steps:
-
name: Checkout
uses: actions/checkout@v2
-
name: Set up QEMU
uses: docker/setup-qemu-action@v1
-
name: Set up Docker Buildx
uses: docker/setup-buildx-action@v1
-
name: Login to DockerHub
uses: docker/login-action@v1
with:
username: ${{ secrets.DOCKERHUB_USERNAME }}
password: ${{ secrets.DOCKERHUB_TOKEN }}
-
name: Build and push
uses: docker/build-push-action@v2
with:
context: .
push: true
tags: lilien1010/php_openresty:latest

MySql的MHA高可用部署

背景

1:先来说一下为什么会出现这种方案,以及这个方案是怎么回事儿?

只要是个服务,就都有宕机的可能,Mysql也不例外,为了让各位运维、DBA、和全栈工程师晚上能睡个安稳觉,有更多的时间和女朋友么么哒,我们希望数据库服务器在宕机的时候能自动恢复过来,最少的影响用户的体验,留下更多的奖金买001。

这个时候我们的MHA(Mysql Highe Available)大显身手了,他的原理就一句话:在Mysql的主从架构下,当主库挂掉的时候,自动将备库升级为主库,同时为其他备库重新设置新的主库。

假设我们有服务器
A:192.168.1.60 (主库)
B:192.168.1.70(备库,备主[主库宕机的情况,提升B为主库])
C:192.168.1.80(备库2)
D:192.168.1.88 (manager,MHA管理中心,安装MHA manager,在主库和备库上面都需要安装MHA node,manager管理node)

让B C 成为A的 slave 机 就不在这里介绍了,很简单的配置.

2:具体原理如下:

1
2
3
4
5
6
7
8
9
10
11
(1)从宕机崩溃的master保存二进制日志事件(binlog events);

(2)识别含有最新更新的slave;

(3)应用差异的中继日志(relay log)到其他的slave;

(4)应用从master保存的二进制日志事件(binlog events);

(5)提升一个slave为新的master;

(6)使其他的slave连接新的master进行复制;

3:MHA的安装,因为MHA的功能是通过perl脚本来实现的,所以我们要安装perl环境

A: 让A B C D四台机子互相无密码登陆

查看A B C D 主机 /root/.ssh/ 下面有没有 id_rsa.pub 文件

如果没有从新生成 ssh-keygen -t rsa -b 2048

然后通过scp命令拷贝到其他三台机子,如下

1
2
3
[root@192.168.1.88 ~]# scp id_rsa.pub root@192.168.1.60:/root/.ssh/ //复制到主机60

[root@192.168.1.60 ~]# cat id_rsa.pub >> authorized_keys

安装必要的perl库,

1
2
3
4
5
6
7
8
9
10
11
12
13
14
15
16
17
18
19
20
21
22
23
24
25
26
27
28
29
[root@192.168.1.88 ~]# yum install cpan perl
[root@192.168.1.88 ~]# yum -y install perl-MIME-Lite perl-Params-Validate perl-DBD-MySQL perl-Config-Tiny perl-Log-Dispatch perl-Parallel-ForkManager perl-Time-HiRes
[root@192.168.1.88 ~]# wget ftp://ftp.muug.mb.ca/mirror/centos/6.5/os/x86_64/Packages/compat-db43-4.3.29-15.el6.x86_64.rpm
[root@192.168.1.88 ~]# wget http://downloads.naulinux.ru/pub/NauLinux/6x/i386/sites/School/RPMS/perl-Log-Dispatch-2.27-1.el6.noarch.rpm
[root@192.168.1.88 ~]# wget http://dl.fedoraproject.org/pub/epel/6/i386/perl-Parallel-ForkManager-0.7.9-1.el6.noarch.rpm
[root@192.168.1.88 ~]# wget http://dl.fedoraproject.org/pub/epel/6/i386/perl-Mail-Sender-0.8.16-3.el6.noarch.rpm
[root@192.168.1.88 ~]# wget http://dl.fedoraproject.org/pub/epel/6/i386/perl-Mail-Sendmail-0.79-12.el6.noarch.rpm
[root@192.168.1.88 ~]# wget http://mirror.centos.org/centos/6/os/x86_64/Packages/perl-Time-HiRes-1.9721-136.el6.x86_64.rpm

[root@192.168.1.88 ~]# rpm -ivh perl-Parallel-ForkManager-0.7.9-1.el6.noarch.rpm perl-Log-Dispatch-2.27-1.el6.noarch.rpm perl-Mail-Sender-0.8.16-3.el6.noarch.rpm perl-Mail-Sendmail-0.79-12.el6.noarch.rpm perl-Time-HiRes-1.9721-136.el6.x86_64.rpm

再安装MHA manager(在192.168.1.88上)

[root@192.168.1.88 ~]# wget https://downloads.mariadb.com/files/MHA/mha4mysql-manager-0.55-0.el6.noarch.rpm


[root@192.168.1.88 ~]# rpm -ivh mha4mysql-manager-0.55-0.el6.noarch.rpm

安装过程中会出现一些缺失的库,自己再去找对应的库就好了;

再在从库安装MHA node(在192.168.1.50、192.168.1.60、192.168.1.70,A、B、C上)

[root@A-B-C ~]#wget https://downloads.mariadb.com/files/MHA/mha4mysql-node-0.54-0.el6.noarch.rpm


[root@A-B-C~]#rpm -ivh mha4mysql-node-0.54-0.el6.noarch.rpm

(缺失perl库的话,按第一步来装好)

配置Manager

1
2
3
4
5
6
7
8
9
10
11
12
13
14
15
16
17
18
19
20
21
22
23
24
shell> mkdir -p /masterha/app1    //创建app目录,用来存放临时数据文件,
shell> mkdir /etc/masterha //创建目录,配置文件目录
shell> vi /etc/masterha/app1.cnf //创建配置文件
[server default]
user=root //linux用于管理mysql用戶名
password=123456 //linux用于管理mysql密码
manager_workdir=/masterha/app1
manager_log=/masterha/app1/manager.log
remote_workdir=/masterha/app1
ssh_user=root //ssh免密钥登录的帐号名
repl_user=slaver //mysql复制帐号,用来在主从机之间同步二进制日志等
repl_password=slaver //mysql密码
ping_interval=1 //ping间隔,用来检测master是否正常


[server2]
hostname=192.168.1.70
port=3306


[server3]
hostname=192.168.1.80
port=3306

设置relay log的清除方式(在每个slave节点上):

1
2
[root@192.168.0.80 ~]# mysql -e 'set global relay_log_purge=0'
[root@192.168.0.70 ~]# mysql -e 'set global relay_log_purge=0’

2、masterha_check_ssh工具验证ssh信任登录是否成功

1
[root@192.168.0.88 ~]# masterha_check_ssh --conf=/etc/masterha/app1.cnf

注意:用ssh-keygen实现4台主机之间相互免密钥登录决定这一步是否成功。

1
2
Wed Apr  23 22:10:01 2014 - [debug]   ok.
Wed Apr 23 22:10:01 2014 - [info] All SSH connection tests passed successfully.

3、masterha_check_repl工具验证mysql复制是否成功

1
[root@192.168.0.88 ~]# masterha_check_repl --conf=/etc/masterha/app1.cnf

注意:上一篇文章中的master–slaver是否成功决定这一步是否成功。或是MHA文件配置的用户账号有关。

1
2
3
4
5
port=3306 
candidate_master=1
master_binlog_dir=/data/mysql
[server1]
hostname=192.168.1.60
1
2
3
4
5
6
7
Wed Apr 23 22:10:56 2014 - [info] Checking replication health on 192.168.1.232..
Wed Apr 23 22:10:56 2014 - [info] ok.
Wed Apr 23 22:10:56 2014 - [warning] master_ip_failover_script is not defined.
Wed Apr 23 22:10:56 2014 - [warning] shutdown_script is not defined.
Wed Apr 23 22:10:56 2014 - [info] Got exit code 0 (Not master dead).

MySQL Replication Health is OK

在出库上面停止mysql,模拟宕机的情况

[root@192.168.0.60 ~]#service mysql stop

我们可以在 manager 机器上面看到输出的日志

[root@192.168.0.88 ~]tail -f /masterha/app1/manager.log

OpenResty 里面的 AES 加密之ECB模式

###先上地址(代码将就着用吧O(∩_∩)O哈哈~)
###https://github.com/lilien1010/lua-aes

因为再nginx+lua,openresty项目要用到 AES的的ecb模式加解密,
但是春哥用openssl实现的string库 我个人觉得不是很好理解。
作为一个PHPer,于是参照php的 mcrypt库,利用luajit的ffi实现了一个aes加解密的库。

aes encrypt with PHP:

1
mcrypt_encrypt(MCRYPT_RIJNDAEL_128, $key,$text, MCRYPT_MODE_ECB );

aes encrypt with lua:

1
2
3
4
5
6
7
8
local data      =   'wait to be encrypted'
local key = '01234567890123456' --length is 16
local mc_ecb = require("resty.ecb_mcrypt")
local ecb = mc_ecb:new();
local enc_data = ecb:encrypt(key,data );
ngx.print(enc_data)
-- you must use 'ngx.print' rather then 'ngx.say'
-- while 'ngx.say' append a '\n' at the end of string

######需要注意输出的数据在客户端要主要数据尾巴后面的\0,因为默认是有padding模式的。而且输出加密后的二进制数据,一定要用ngx.print,因为ngx.say会在数据的最后输出换行符(已经坑了部分人了)

同时你需要在操作系统里面安装 libmcrypt的库

1
yum install libmcrypt libmcrypt-devel

如果解析不出来 可能是因为 默认的padding模式,需要删除尾巴后面的空格,解析的时候要去掉 padding

其实利用类似的想法,基本上 OpenResty 里面缺少的库,利用 luajit 的 ffi 从 php 扩展里面参照代码,实现一份,还是挺简单的。

lua-charCodeAt

JS函数charCodeAt的Lua实现

charCodeAt by Lua

@(Lua JavaScript charCodeAt)

I wanted to have a function charCodeAt in Lua ,and it should works exactly like javascript
but with Lua5.1 ,UTF8 and Unicode are not supported,

1: how charCodeAt works in javascript

to show Console press F12 in Chrome( MAC:CMD+alt+J)

1
2
3
4
5
[
'你'.charCodeAt(0),
'ñ'.charCodeAt(0),
'n'.charCodeAt(0)
]

it will output [20320, 241, 110] ,it means the numeric value of Unicode , ‘你’=20320 , ‘ñ’=241, ‘n’=110.

The charCodeAt() method returns the numeric Unicode value of the character at the given index (except for unicode codepoints > 0x10000).

according to alexander-yakushev we can know how many bytes one UTF8 word takes using function utf8.charbytes
[https://github.com/alexander-yakushev/awesompd/blob/master/utf8.lua]

1
2
3
4
5
6
7
8
9
10
11
12
13
14
15
16
17
18
19
function utf8.charbytes (s, i)
-- argument defaults
i = i or 1
local c = string.byte(s, i)
-- determine bytes needed for character, based on RFC 3629
if c > 0 and c <= 127 then
-- UTF8-1 byte
return 1
elseif c >= 194 and c <= 223 then
-- UTF8-2 byte
return 2
elseif c >= 224 and c <= 239 then
-- UTF8-3 byte
return 3
elseif c >= 240 and c <= 244 then
-- UTF8-4 byte
return 4
end
end

Unicode & UTF8 convert method

Unicode code range UTF-8 code example
hex code binary code char
0000 0000-0000 007F 0xxxxxxx n(alphabet)
0000 0000-0000 007F 110xxxxx 10xxxxxx ñ
0000 0080-0000 07FF 1110xxxx 10xxxxxx 10xxxxxx (most CJK)
0001 0000-0010 FFFF 11110xxx 10xxxxxx 10xxxxxx 10xxxxxx other chars

but we should pay attention to 4 bytes UTF8[emoji], it works not that simple

special Method

javascript engine using UTF16,characters in Basic Multilingual Plane were the same with unicode, but if the characters were in Supplementary Plane it should use the formula below,usually we encounter Supplementary Plane emoji like😝 (4 byte UTF8 character)

1
2
3
-- formula 1
H = Math.floor((c-0x10000) / 0x400)+0xD800
L = (c - 0x10000) % 0x400 + 0xDC00

###code is here
###https://github.com/lilien1010/lua-bit

Feedback & Bug Report


Thank you for reading this , if you got any better idea, share it.